


Convenience
An eSIM is a digital SIM embedded in your device, so there’s no fuss with swapping physical SIM cards.

What is eSIM?
Convenient & Flexible

Convenient & Flexible
eSIM Service
in Thailand
No more removing and switching
What is an eSIM?
An eSIM, or embedded SIM, is a digital SIM built directly into your device, whether it’s a smartphone, tablet, smartwatch, or any other electronic gadget. You can register your eSIM and start using it immediately on your device, eliminating the hassle of swapping out physical SIM cards. Say goodbye to the worry of losing your SIM and the inconvenience of removing the SIM tray to switch cards!
Instead of switching out SIM cards, you can activate and use your eSIM by simply scanning a QR code. Once set up, your eSIM connects to your network just like a traditional SIM card. Thailand’s True-dtac eSIM service makes it easy to stay connected, especially if you’re frequently on the move.
It’s More Convenient! One eSIM can support up to 6 different numbers on a single device, compatible with all networks for both prepaid and postpaid plans. You can easily switch between numbers as needed, and even use it when traveling abroad. The eSIM is designed for convenience and flexibility, making it the ideal solution for your connectivity needs.
Why Switch
an eSIM?


Easy
Buy online and get your eSIM instantly—it’s an easy setup that you can handle yourself! With an eSIM iPhone or Android device, you can activate your eSIM almost immediately.
iOS & Android Friendly!
An eSIM works seamlessly on both iOS and Android devices, with options for prepaid and postpaid plans.
Supports Up to 6 Numbers
Manage up to 6 different numbers on one device. No more juggling multiple SIM cards—switching between numbers is easy.
Travel Made Easy!
Easily switch between numbers when traveling abroad. Tap to swap, and you’re set! Thailand’s True eSIM service simplifies your connectivity, even if you’re on an international trip.Compatible Phones and Devices for eSIMs
Apple

iPhone
- iPhone 16e, iPhone 16, iPhone 16 Plus
- iPhone 16 Pro, iPhone 16 Pro Max
- iPhone 15, iPhone 15 Plus, iPhone 15 Pro, iPhone 15 Pro Max
- iPhone 14, iPhone 14 Plus, iPhone 14 Pro, iPhone 14 Pro Max
- iPhone 13, iPhone 13 mini, iPhone 13 Pro, iPhone 13 Pro Max
- iPhone 12, iPhone 12 mini, iPhone 12 Pro, iPhone 12 Pro Max
- iPhone SE (3rd Gen)
- iPhone SE (2nd generation)
- iPhone 11, iPhone 11 Pro, iPhone 11 Pro Max
- iPhone XS
- iPhone XS Max
- iPhone XR
iPad
- iPad mini (ชิป A17 Pro)
- iPad Pro (M4) WiFi + Cellular
- iPad Pro 11-inch (4th generation) WiFi + Cellular
- iPad Pro 12.9-inch (5th & 6th generation) WiFi + Cellular
- iPad Air (M2) WiFi + Cellular
- iPad (10th generation) WiFi + Cellular
- iPad Pro 11-inch (1st Gen, 2nd Gen, 3rd Gen)
- iPad Pro 12.9-inch (3rd Gen, 4th Gen)
- iPad Air (3rd Gen, 4th Gen, 5th Gen)
- iPad (7th Gen, 8th Gen, 9th Gen)
- iPad mini (5th Gen, 6th Gen)
Apple Watch
- Apple Watch SE (2nd generation)
- Apple Watch Series 9 GPS + Cellular
- iPad Pro 12.9-inch (5th & 6th generation) WiFi + Cellular
- iPad Air (M2) WiFi + Cellular
- iPad (10th generation) WiFi + Cellular
- iPad Pro 11-inch (1st Gen, 2nd Gen, 3rd Gen)
- iPad Pro 12.9-inch (3rd Gen, 4th Gen)
- iPad Air (3rd Gen, 4th Gen, 5th Gen)
- iPad (7th Gen, 8th Gen, 9th Gen)
- Pad mini (5th Gen, 6th Gen)
Samsung

HONOR

OPPO
vivo
Huawei
Xiaomi
Other

How to Download an eSIM
Your device needs an internet connection to download an eSIM. Connect through your existing SIM or use WiFi.
IOS
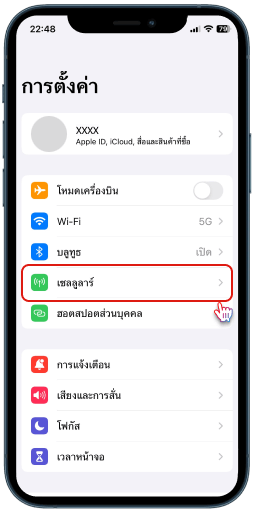
Step 1
Go to Settings
and select Cellular
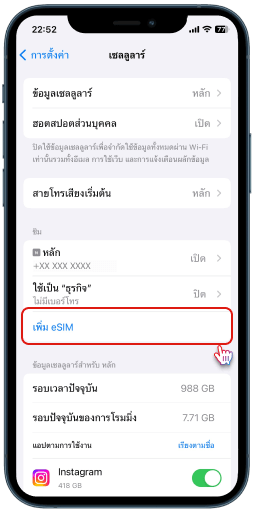
Step 2
Tap on Add eSIM
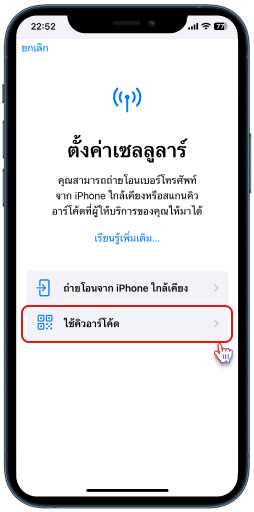
Step 3
Select Use QR Code
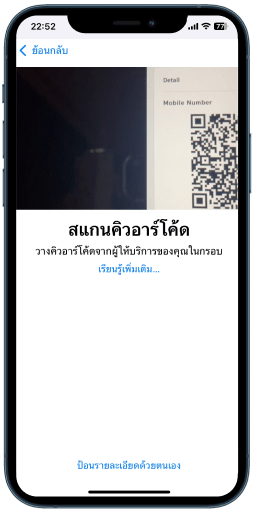
Step 4
Scan the QR code you received via email or saved on your device
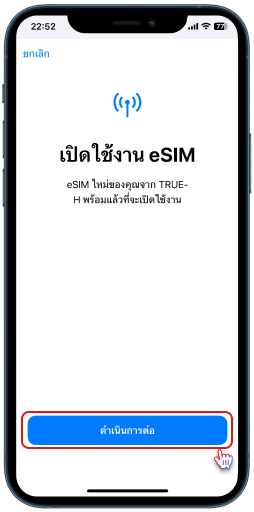
Step 5
Tap on Continue
Step 6
Your eSIM will be successfully added to your device!
Android
Step 1
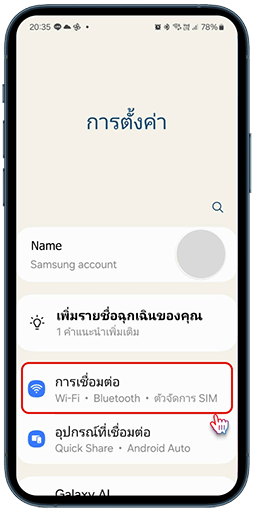
Go to Settings
and select Connections
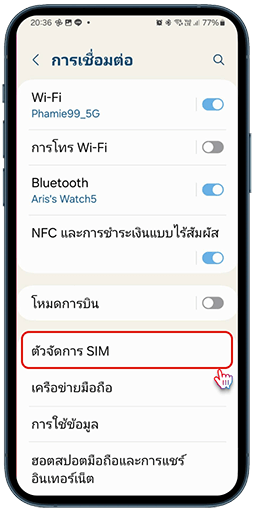
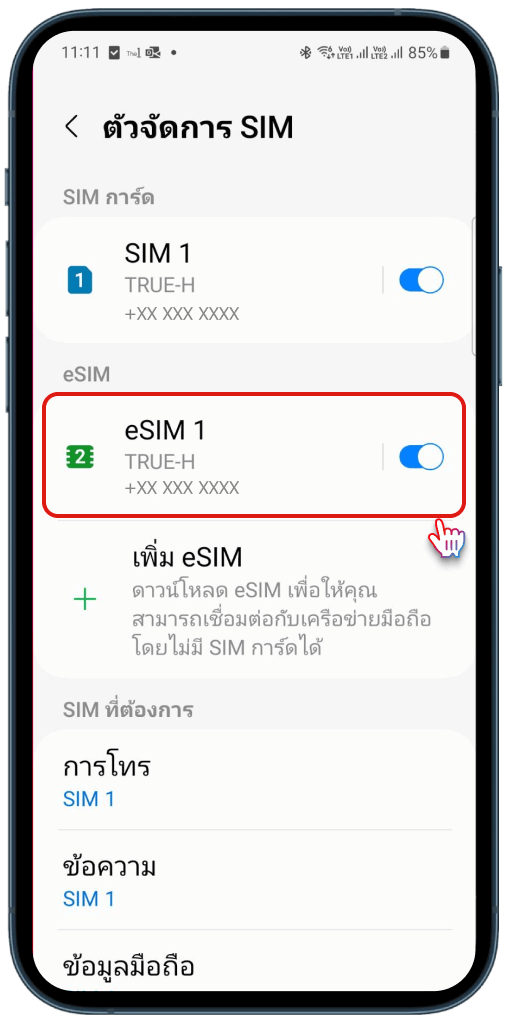
Step 2
Tap on SIM Manager
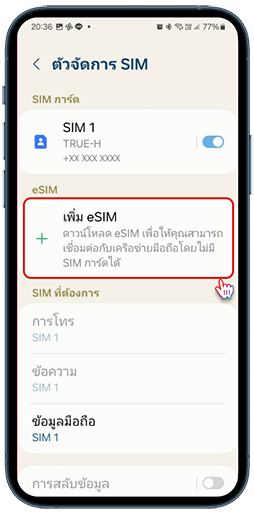
Step 3
Tap on Add eSIM
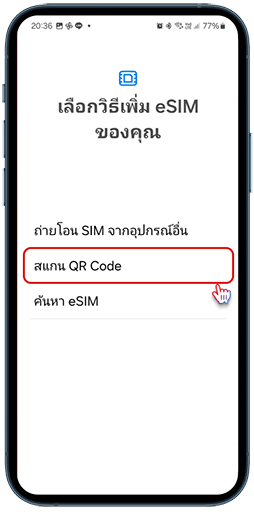
Step 4
Tap on Scan QR Code
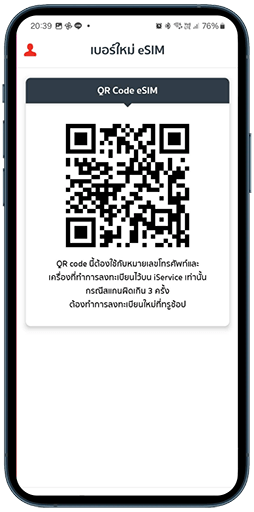
Step 5
Scan the QR code you received via email or saved on your device
Step 6
Your eSIM will be successfully added to your device!


Travel Hassle-Free
with eSIMs


Get Your New Number
with an eSIM
Frequently Asked Questions About eSIMs
If you're looking to stay connected in Thailand with ease, the True eSIM service may be the perfect solution. Whether you’re a tourist or resident in Thailand, True-dtac’s eSIM services provide flexibility and a seamless experience across compatible devices. Read the answers to frequently asked questions and find out all you need to know about our eSIM.
What type of True-dtac customer can use eSIM services in Thailand?
How many eSIMs can be used on one device?
Can I use my Thai eSIM number like a regular SIM card?
Where can I get my SIM card changed to eSIM?
Is there a service fee for using eSIMs in Thailand?
Can I switch my existing eSIM number from another network to True-dtac's eSIM?
Can I use my eSIM abroad?
Where can I get my SIM card changed to eSIM?
Is there a service fee for using eSIM?
Can I use iMessage and FaceTime with both numbers?
Why Buy Your Thailand eSIM from True-dtac?
True-dtac is a leading provider of Thailand’s eSIM service, offering plans designed with convenience and flexibility in mind. Here’s why True-dtac is the top choice for eSIMs in Thailand:
Reliable Network Coverage Across Thailand
True-dtac provides excellent coverage nationwide, ensuring consistent connectivity wherever you travel within Thailand. You’ll stay connected whether you're exploring urban centers or rural landscapes.
Affordable Data Plans
True-dtac offers competitive rates on eSIM services in Thailand for locals and tourists. You can choose from prepaid and postpaid options, including packages tailored for tourists, giving you the best value for your data needs.
Easy Online Purchase and Setup
It’s easy to buy the eSIM service from True-dtac. Purchase online and receive your QR code to activate your eSIM on your device within minutes—ideal for visitors wanting to set up their Thailand eSIM before they even land.
Customer Support and Flexibility
True-dtac provides around-the-clock customer support, ensuring your experience is smooth and worry-free. Switching to an eSIM or managing your Thailand tourist plan is just a click away, with options available through the True iService app.
How to Switch to eSIM via True App
For this process, your device needs an internet connection. Please connect through your existing SIM or use Wi-Fi
2
True customers can switch by themselves via the True App ![]() Download Now
Download Now
- Open True App or press here
- Login with any 3 types
- Login by mobile number
- Login by email that registered TrueID
- Login by TrueOnline number
- Presss 3-points icon on the right up (beside bell icon)to Account info
- Then press Switch numbers for choosing the number that you want to switch to eSIM, if it’s already show that number, please skip this
- Then scroll down to topic Manage Account, then press Switch to True eSIM
- Select number you want to use an eSIM then press Next
- Press Request OTP then enter OTP code to verify phone number then press Confirm OTP
- Then enter EID number then press Next
- Fill-in your email and mobile number which to receive QR code for download eSIM in this device and then press Next
- Press Activate this numberto eKYC Process *You must be completed this process then you will receive email and SMS for QR code
- Open email or sms to get QR code then download eSIM in this device.
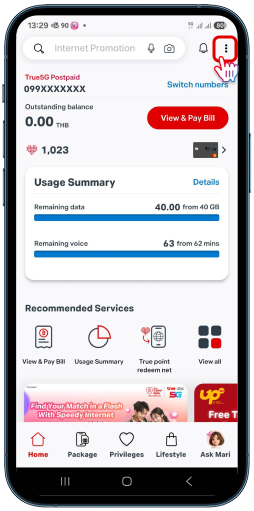
Step 1
Presss 3-points icon on the right up
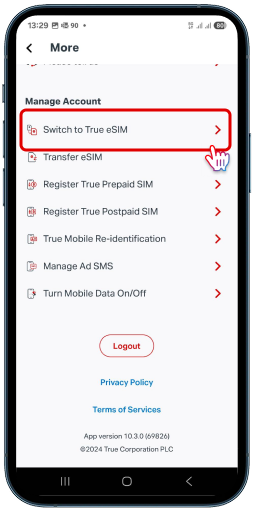
Step 2
Select Switch to True eSIM
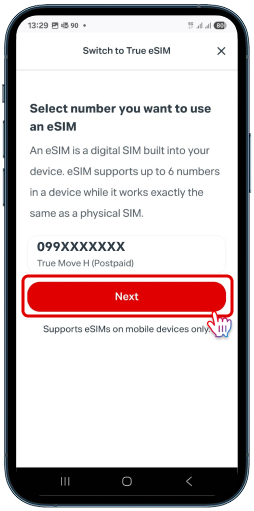
Step 3
Choose the number to switch to eSIM and tap Next
Step 4
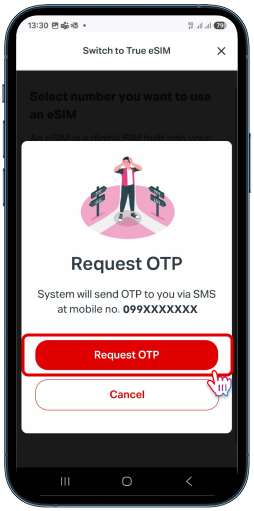
Tap Request OTP
Step 5
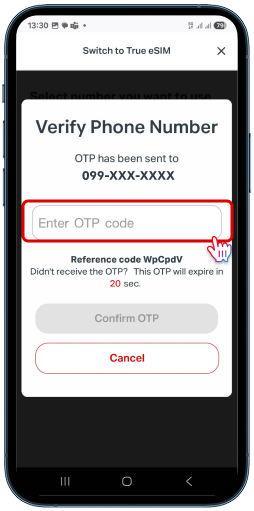
Enter the OTP

Step 6
Enter the 32-digit EID number
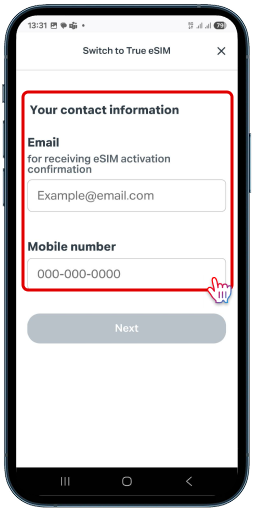
Step 7
Enter your email and contact number and tap Next
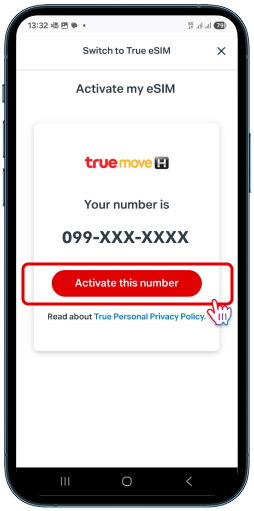
Step 8
Tap Activate this number
How to Transfer eSIM via True App
For this process, your device needs an internet connection. Please connect through your existing SIM or use Wi-Fi
2
True customers can switch by themselves via the True App ![]() Download Now
Download Now
- Open True App or press here
- Login with any 3 types
- Login by mobile number
- Login by email that registered TrueID
- Login by TrueOnline number
- Presss 3-points icon on the right up (beside bell icon)to Account info
- Then press Switch numbers for choosing the number that you want to switch to eSIM, if it’s already show that number, please skip this
- Then scroll down to topic Manage Account, then press Switch to True eSIM
- Select number you want to use an eSIM then press Next
- Press Request OTP then enter OTP code to verify phone number then press Confirm OTP
- Then enter EID number then press Next
- Fill-in your email and mobile number which to receive QR code for download eSIM in this device and then press Next
- Press Activate this numberto eKYC Process *You must be completed this process then you will receive email and SMS for QR code
- Open email or sms to get QR code then download eSIM in this device.
Step 1
Presss 3-points icon on the right up
Step 2
Select Transfer eSIM
Step 3
Choose the number to transfer to eSIM and tap Next
Step 4
Tap Request OTP
Step 5
Enter the OTP
Step 6
Enter the 32-digit EID number
Step 7
Enter your email and contact number and tap Next
Step 8
Tap Activate this number
How to Convert a Physical SIM Card to eSIM via iPhone
For this process, your device needs an internet connection. Please connect through your existing SIM or use Wi-Fi
- Tap the Settings icon (gear symbol) on the iPhone.
- Select the Cellular menu and choose the number to convert from physical SIM card to eSIM.
- Tap the Convert to eSIM option on the SIM details page.
- Verify the number to convert from physical SIM card to eSIM, then tap Convert to eSIM.
- Review the eSIM conversion details and confirm by tapping Convert to eSIM.
- Verify identity by entering the ID card/passport number registered as the owner of this number.
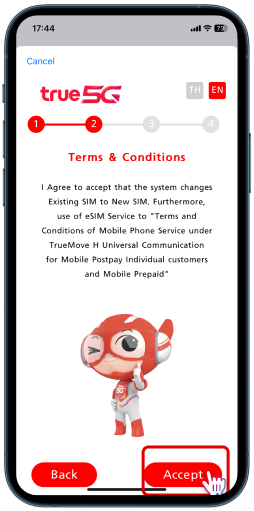
- Read the terms and conditions of service. If agreeing to the conditions for converting to eSIM, tap Accept.
- Review the ID card/passport number and phone number, then tap Activate.
- The system will proceed with the conversion to eSIM and display a thank you page. Tap Close to finish.
- The system will configure cellular settings. Once completed, tapDone to start using the eSIM.
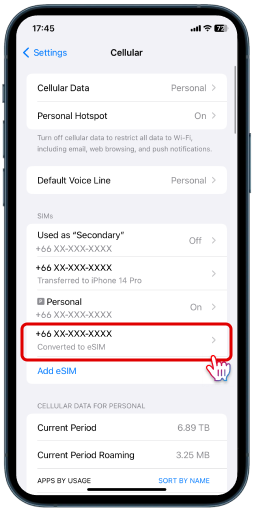
- In the Cellular menu, it will show that the number previously associated with a physical SIM card has been converted to eSIM. The eSIM status will show as On and the physical SIM card status will indicate that it has been converted to eSIM. The physical SIM card can be removed from the device.
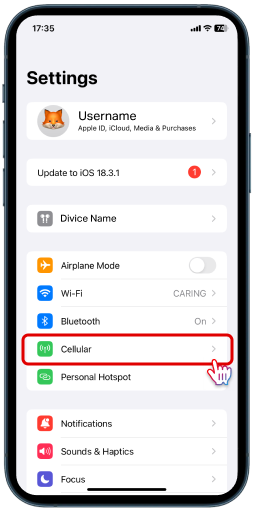
Step 1
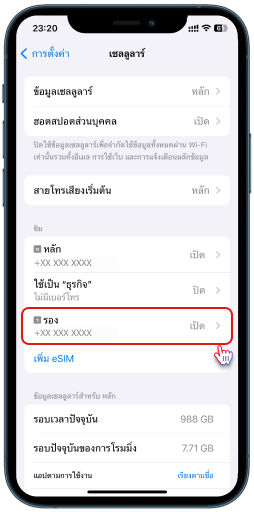
Select the Cellular menu

Step 2
Choose a number to convert to eSIM.

Step 3
Tap the Convert to eSIM
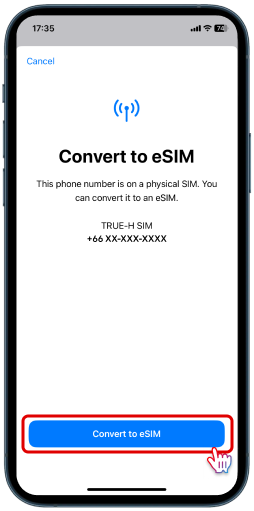
Step 4
Verify the number then tap Convert to eSIM.
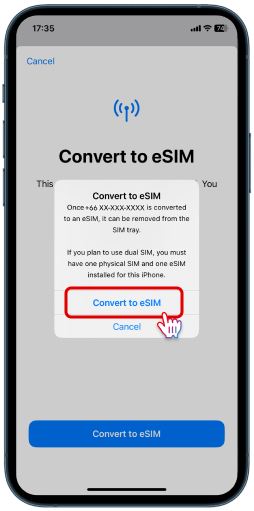
Step 5
Check the details and tap Convert to eSIM to confirm.
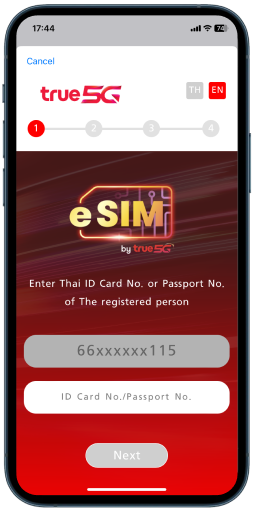
Step 6
Enter your ID or passport to verify identity.
Step 7
Review the terms and tap Accept to proceed.
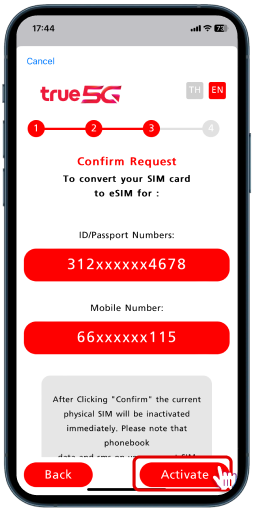
Step 8
Tap Activate.
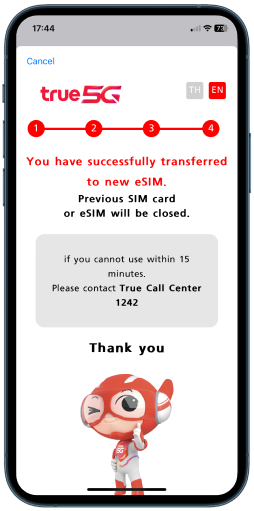
Step 9
A thank you page will display. Tap Close to finish.
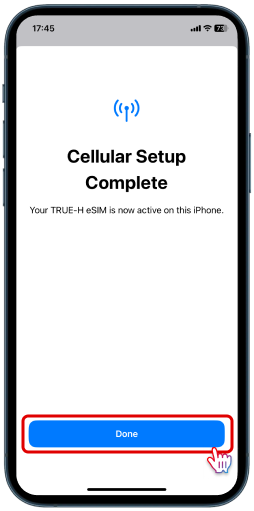
Step 10
Tap Done to start using the eSIM.
Step 11
The number linked to the physical SIM card is now an eSIM. Its status is On, and the physical SIM card can be removed.
How to Transfer eSIM via iPhone
For this process, your device needs an internet connection. Please connect through your existing SIM or use Wi-Fi
- Prepare the new iPhone and the previous iPhone for the eSIM transfer.
- Tap the Settings icon (gear icon) on the new iPhone.
- Select the Cellular menu and tap Add eSIM at the bottom of the SIMs section to start the eSIM transfer.
- When the Set Up Cellular page appears, select Transfer from Nearby iPhone to transfer the eSIM.
- The system will display the Transfer From Nearby iPhone page. Unlock the previous iPhone, enable Bluetooth, and ensure it is running iOS 16 or later. Place the previous iPhone close to the new iPhone.
- On the previous iPhone, the option to Transfer Phone Number will appear. Tap Continue to confirm the transfer.
- On the new iPhone, a Verification Code will appear. Enter the verification code on the previous iPhone.
- On the new iPhone, the Transfer Your Phone Number page will appear. Select the phone number to transfer and tap Continue. Then, check the previous iPhone. The system will display Continue on Your Other iPhone.
- On the new iPhone, review the phone number transfer details, then tap Transfer Number to proceed. Afterward, check the previous iPhone. The system will display Continue on Your Other iPhone.
- On the new iPhone, verify identity by entering the ID card/passport number registered as the owner of this number.
- Read the terms and conditions of service. If agreeing to the conditions for converting to eSIM, tap Accept.
- Review the ID card/passport number and phone number, then tap Activate.
- The system will proceed with the conversion to eSIM and display a thank-you page. Tap Close to finish.
- Return to the previous iPhone and tap Continue on the Transfer Started page.
- On the new iPhone, the system will set up the cellular settings. When complete, tap Done to start using the eSIM.
- On the new iPhone, when entering the Cellular menu, it will show that the phone number has been transferred to the new iPhone. The eSIM status will be displayed as On. Afterward, an SMS from TrueMove H will be received, stating: ทรูมูฟเอชดำเนินการเปลี่ยนซิมการ์ดใหม่ให้ท่านเรียบร้อยแล้ว ขอบคุณที่ใช้บริการ On the previous iPhone, the phone number status will indicate that it has been transferred to the new iPhone.
Step 1
Select the Cellular menu
Step 2
Tap Add eSIM
Step 3
Tap Transfer from Nearby iPhone
Step 4
Show the Transfer From Nearby iPhone page.
Step 5
On the previous iPhone, tap Continue to confirm the Transfer Phone Number.
Step 6
Verification Code from the previous iPhone.
Step 7
On the new iPhone, enter the Verification Code
Step 8
On the new iPhone, select the phone number and tap Continue.
Step 9
Then, check the previous iPhone. The system will display Continue on Your Other iPhone.
Step 10
On the new iPhone, review the details and tap Transfer Number. Then, check the previous iPhone for Continue.
Step 11
On the new iPhone, verify identity by entering the registered ID/passport number.
Step 12
Read the terms and tap Accept to agree to the eSIM conversion.
Step 13
Review the details and tap Activate.
Step 14
Show a thank-you page. Tap Close to finish.
Step 15
On the previous iPhone, tap Continue on the Transfer Started page.
Step 16
When complete, tap Done to start using the eSIM.
Step 17
On the new iPhone, the phone number will show as transferred in the Cellular menu with eSIM status as On.
Step 18
You’ll receive an SMS from TrueMove H confirming the transfer.